
Getting started part 5: Making the game - Dragon Eggs - Designing the map
If you didn't complete tutorial 4 but still want to play along, grab this: DragonEggs_Tutorial5Start.zip
This continues the game we started in part 3 and continued in part 4.
It's time to make our level using rock walls so the player has to navigate around things.
First, assign collision to the rock like we did for the player earlier. Make it like this:
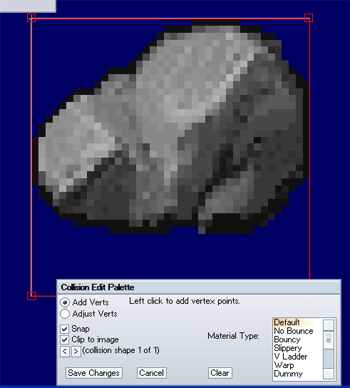
Click Save Changes. With the rock still selected, right click it, and choose "properties". Set its layer to be "Detail 1". This way, it appears above our brick ground tiles (they are all on "Main", remember?) yet under our other entities.
Tip: When editing collision for tiles, "Clip to image" is checked by default. This means even though you try to create/move a vertex outside of of the image, it limits it exactly to the image size.
Enable grid-snap and make sure it's at 40 for the X and Y. Drag strips out and tap f to flood fill them with rocks.
Tip: To TilePaint, hold down V while moving the mouse over the area you'd like to paint.
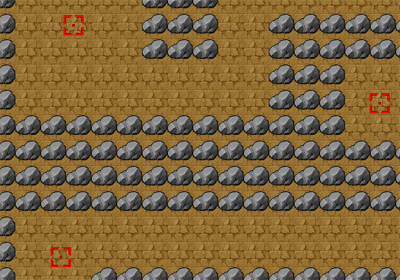
Design a simple level something like this: (I've zoomed out a bit so it all fits on the screen, this can be useful when laying out a level)
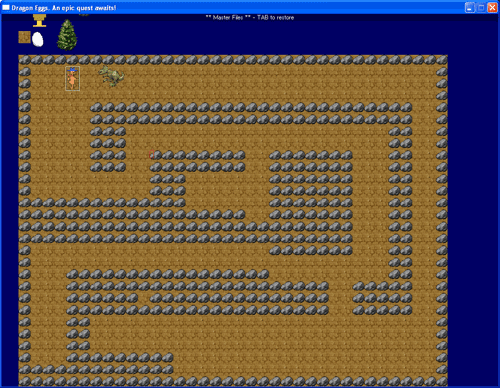
Hmm, reminds me of boulderdash.
This was very fast to make. I flood filled the rocks over most of the area and created the open spaces by making rectangular selections (hold Ctrl while left-mouse-button dragging to force a selection to start instead of clicking something) on strips of the rocks and tapping delete to remove them. (I had the "Main" layer not active for edit so I didn't select the brick tiles)
Hit R while in the editor to change the camera zoom to 1:1 before playing.
Hit F1 to play, you can walk around and cannot walk through rocks.
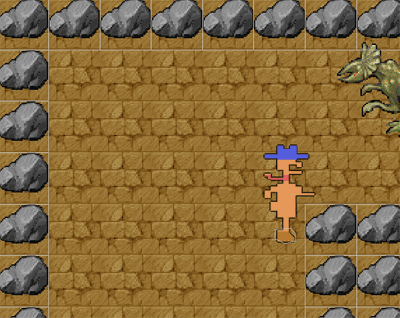
If you press Ctrl-Q in the editor, you should see the collision of the level and the player like above.
Notice that all the other rocks now have collision boxes too. Because they are the exact rectangle from the same image, this data is shared. If you cut a new tile from an existing rock that was a slightly different size, it would not have the collision information.
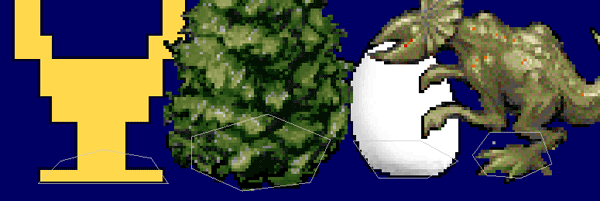
Next, add collision information to the dragon, tree, egg, and chalice.
WARNING: For dragon (and the rest if you want), make sure the X/Y point is inside his collision area, like we did with the player. This will help his AI pathfinding to work better.

Now, select the chalice, tree, dragon, player and egg and open their tile properties. Enable "Cast shadow".
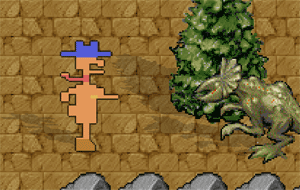
These auto shadows add a slight feeling of depth.
Tip: The shadowing system takes into account the collision information when drawing it, so if you have a tall image with a tiny collision at the bottom, it understands it's a flagpole standing upright and not a flagpole laying on the ground.
Ok, at this point, the player can float around, but nothing else does anything. Let's give the dragon some AI so he can patrol the area.
Now, we could just have him randomly walk around and turn around when he bumps into walls, but a better way in this case is probably to use waypoints. Instead of needing to visit them in order, we'll just have him randomly pick one of them to go to, so he'll be less predictable.

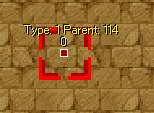
In the map selector, switch to the System Palette and select the Waypoint entity. It's sort of hard to click, you have to click on a pixel with color or just drag selected it.
Switch back to "Main" and paste it on your map.
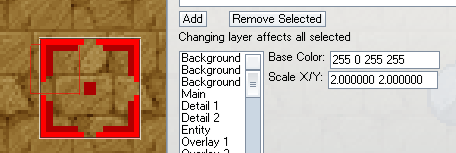
It's a little hard to see, let's make it stand out more. Open its properties and change the color to "255 0 255 255" and the scale to "2 2". It should now look red like in the above picture.
Using cut and paste, put four of these in your level. These will be places the dragon patrols. The level design and placement doesn't really matter so much, but the idea is put them in out of the way places so the dragon will have to walk pretty far to get there. Don't put them too close to walls.
Tip: If you check, these waypoint entities are on layer "Hidden Data". This layer is setup to only show in the editor, they will be invisible in the game.
Name them as follows:
point1
point2
point3
point4
Great. Now let's let's give the dragon a script and tell him to walk to each one of them.
Open the dragon's entity properties. Click Convert to entity. Currently, this messes up the position of his collision date, use the collision editor to fix it. (Maybe this is fixed in your version..)
Open his properties and enter "dragon.lua" for the script and click edit, say yes when it asks you if it wants to create the file.
For his script, cut and paste this in:
function OnInit() //run upon initialization

	//hint to the path-finding system that it can ignore this while computing paths if it needs to
	this:SetIsCreature(true);
end

function OnPostInit() //run after being placed on a map

	this:GetBrainManager():Add("StandardBase","");

	AddPatrolGoals();

end

function OnKill() //run when removed

end

function AddPatrolGoals()

	//let's make him move to the four checkpoints

	this:GetGoalManager():AddApproach(GetEntityByName("point1"):GetID(), C_DISTANCE_CLOSE);
	this:GetGoalManager():AddApproach(GetEntityByName("point2"):GetID(), C_DISTANCE_CLOSE);
	this:GetGoalManager():AddApproach(GetEntityByName("point3"):GetID(), C_DISTANCE_CLOSE);
	this:GetGoalManager():AddApproach(GetEntityByName("point4"):GetID(), C_DISTANCE_CLOSE);

	this:GetGoalManager():AddSay("All done", C_FACING_NONE);
end
Zoom out so you can see the whole map, then toggle off the editor and see what the dragon does. Well, if he's close to the "point1" tag, he'll correctly move to it. If there are any kinds of walls in the way, he'll get stuck forever or try for a bit and give up and generally fail horribly.
Lucky for us this is easy to fix. You can make his movement much smarter by hand-placing some "path nodes" around the map.
First, go grab a path node from the System Palette by selecting the green circle with the foot icon and hitting Ctrl-C to copy it into the buffer.
Switch back to your level. (the "Main" map)
Next, from the editor drop-down menu, enable Display->Show Map Pathfinding Data.
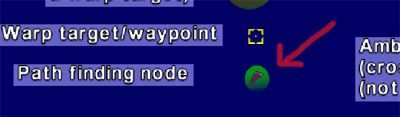
Zoom in on one of the waypoints you setup earlier.
Hmm, what's this? The waypoints you placed have some weird data overlayed. This is because they operate as path nodes also. You can ignore the numbers, they really are for me to debug stuff with.
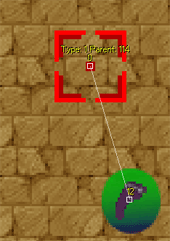
Paste the green-foot path node next to it. You should see a line automatically appear between them. This is the navigation graph.
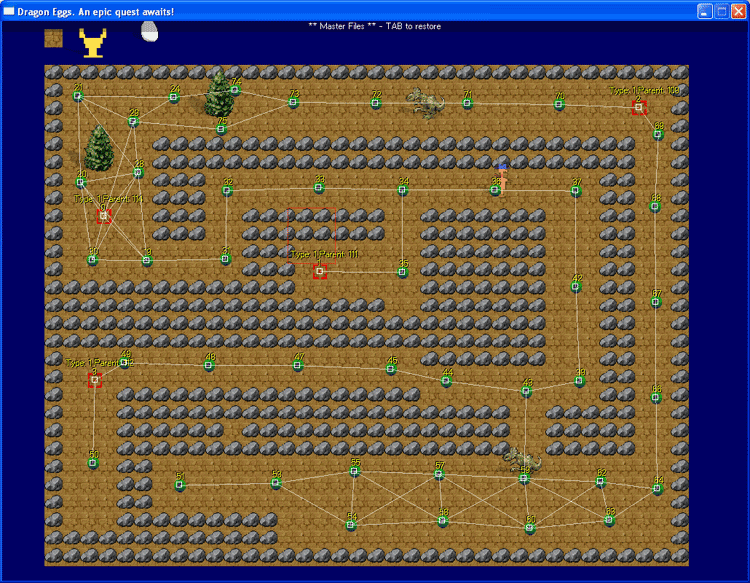
Place these around the map as shown. The only rules are don't place them too close to walls, or let the lines between them get too close to walls. More nodes means the AI will have more choices when choosing routes to take.
If you place two nodes and no lines connect between them, they are either out of range from each other (move it closer) or there is something that isn't a 'creature' blocking things.
Click and drag the dragon a little bit. (this is a quick way to force him to be reinitialized so he'll move to each waypoint again)
Disable the editor and watch the action. You should see the dragon smartly move to each point. Much better!
Tip: Hold down TAB to speed-up the game so the dragon moves faster.
© Copyright Seth A. Robinson and Robinson Technologies